Photography is undoubtedly one of the most important inventions in history -- it has truly transformed how people conceive of the world. Now we can "see" all sorts of things that are actually many miles -- and years -- away from us. Photography lets us capture moments in time and preserve them for years to come.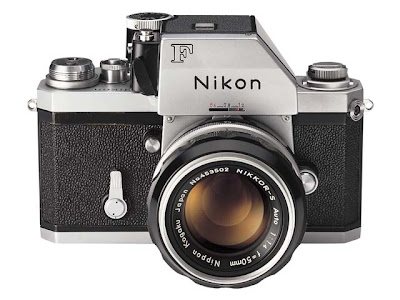
A fully manual single-lens-reflex camera.
The basic technology that makes all of this possible is fairly simple. A still film camera is made of three basic elements: an optical element (the lens), a chemical element (the film) and a mechanical element (the camera body itself). As we'll see, the only trick to photography is calibrating and combining these elements in such a way that they record a crisp, recognizable image.
There are many different ways of bringing everything together. In this article, we'll look at a manual single-lens-reflex (SLR) camera. This is a camera where the photographer sees exactly the same image that is exposed to the film and can adjust everything by turning dials and clicking buttons. Since it doesn't need any electricity to take a picture, a manual SLR camera provides an excellent illustration of the fundamental processes of photography.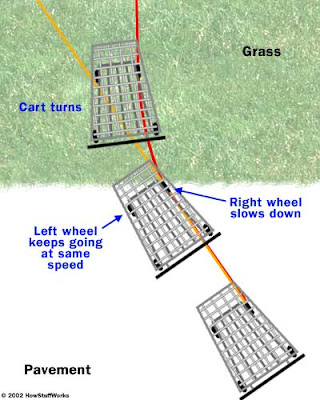
The optical component of the camera is the lens. At its simplest, a lens is just a curved piece of glass or plastic. Its job is to take the beams of light bouncing off of an object and redirect them so they come together to form a real image -- an image that looks just like the scene in front of the lens.
But how can a piece of glass do this? The process is actually very simple. As light travels from one medium to another, it changes speed. Light travels more quickly through air than it does through glass, so a lens slows it down.
When light waves enter a piece of glass at an angle, one part of the wave will reach the glass before another and so will start slowing down first. This is something like pushing a shopping cart from pavement to grass, at an angle. The right wheel hits the grass first and so slows down while the left wheel is still on the pavement. Because the left wheel is briefly moving more quickly than the right wheel, the shopping cart turns to the right as it moves onto the grass.
The effect on light is the same -- as it enters the glass at an angle, it bends in one direction. It bends again when it exits the glass because parts of the light wave enter the air and speed up before other parts of the wave. In a standard converging, or convex lens, one or both sides of the glass curves out. This means rays of light passing through will bend toward the center of the lens on entry. In a double convex lens, such as a magnifying glass, the light will bend when it exits as well as when it enters.
This effectively reverses the path of light from an object. A light source -- say a candle -- emits light in all directions. The rays of light all start at the same point -- the candle's flame -- and then are constantly diverging. A converging lens takes those rays and redirects them so they are all converging back to one point. At the point where the rays converge, you get a real image of the candle. In the next couple of sections, we'll look at some of the variables that determine how this real image is formed.
Wednesday, November 7, 2007
Cameras: intro
CineAlta 24P HDCAM Camcorder( without viewfinder)
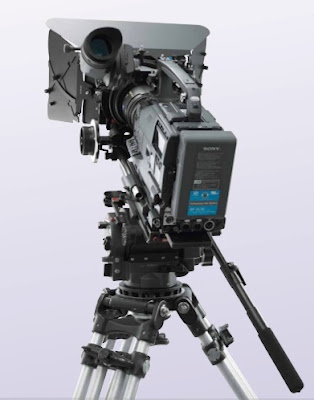
The highly respected HDW-F900 camcorder has now been refined into the next-generation HDW-F900R, offering a variety of further enhanced functionalities. The HDW-F900R camcorder records images in accordance with the CIF (Common Image Format) standard, which specifies a sampling structure of 1920 x 1080 active pixels (horizontal x vertical). Plus, as well as recording at 24P, the HDW-F900R camcorder is switchable to record at 25P, 29.97P progressive scan, and also at 50 or 59.94 Hz interlaced scan. The camcorder also provides a comprehensive range of features for creative shooting such as enhanced gamma features and colorimetry controls. Plus, the design of the HDW-F900R is highly compact and lightweight, giving users higher levels of mobility and comfort when shooting. To further enhance the creative and operational versatility of the camcorder, a wide range of optional accessories are available. These include a picture cache board, a 2-3 Pull-down and down converter board, and a slow-shutter board. In combination with its renowned 24P capability and attractive cost efficiency, all of these great functionalities make the HDW-F900R the perfect solution for shooting television series , documentaries, commercials, as well as motion pictures.
Highlight
Camera image capture complies with the ITU-R, BT 709-3 Recommendation for High Definition Production and International Programe Exchange
Equipped with 2/3" type 2,200,00 sensor FIT imager, providing high resolution 16:9 images
Compact, lightweight and robust body design with cinematography accessories attached
Continuous recording time of up to 50 minutes (24P mode)
Newly developed LSI for ADSP (advanced digital signal processor) improves picture quality, ensuring picture stability and operational reliability while reducing total power consumption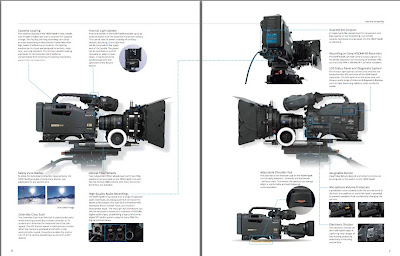
Review: Sony DSR-PD170 (DVCAM)
Designed to appeal both to the serious enthusiast and professional users, but is the VX2100's big brother DVCAM model worth the additional expense?
Unveiled in late 2003 at Amsterdam's IBC exhibition, Sony's DSR-PD170 DVCAM camcorder was designed to succeed the DSR-PD150P - a model which has seen huge popularity not only among serious video producers but also many TV documentary programme makers who have opted for the camcorder's ease of single-operator use and portability that lighter models bring. This model sits in the middle of the company's range of professional-quality DVCAM products and uses the higher-specification DVCAM format which takes advantage of specially-formulated tape to record a track-pitch of 15 microns as opposed to Mini-DV's 10 microns (SP). The increase in this track pitch brings about a reduction in recording time, and for that reason the PD170 will record only 40 minutes on a tape which can be used to record 60 minutes of Mini DV footage. The DVCAM format is preferred to Mini-DV by broadcasters, not least because the models in the range offer proper balanced XLR audio inputs and a higher degree of manual control over how they're managed.
Design and Layout
Both camcorders share similar physical characteristics and handling, though a short-barrelled directional mono microphone is provided in place of the VX2100's built-in stereo microphone, with the whole of the carry-handle's front assembly being taken over by the PD170's audio facilities. All other aspects of the camcorder's design and layout are virtually identical to the DCR-VX2100 (see our exclusive review), with the exception that the body is a darker shade of grey. Compared to the average single-chip consumer DV camcorder, the PD170 is much heavier and sports many more features as befits its professional status. The large non-detachable f1.6 zoom lens features free-spinning focus and zoom rings as well as a new lens hood with a built-in shutter-style lens cap, which is activated by a switch to the rear left of the lens hood itself. The main left side of the body houses a 2.5" 211,000 pixel colour LCD screen, in addition to a selection of manual switches controlling focus (manual, auto, infinity check), two-step ND (Neutral Density) filter, manual iris (exposure) thumbwheel, an index marker button as well as a Push Auto which gives the operator instant Auto functionality in an emergency. Fader, Back Light and Spot Light buttons sit snugly on the lower left of the body near the tripod plate level. At the rear of the main body can be found a range of manual controls for Gain, Shutter Speed, White Balance and AE Shift. These are modified using the now-familiar menu thumbwheel, once the Menu function has been selected by the button that nestles among other buttons that hide behind the recessed LCD screen. It's here where the Display on/off, Data Code, Title and Timecode/U-Bit buttons are found along with a range of Memory Stick related functions, too. It's here where the button to activate the PD170's Zebra pattern generator is found, too. Supplied with the camcorder is a Sony NP-F330 InfoLithium battery which looks lost in the deep battery recess that is provided on the PD170 (as it is with the VX2100, too). The viewfinder is a definite improvement over that of the PD150, and now sports a larger cupped rubber eyepiece which can be adjusted to suit the operator's preferences. The camcorder's viewfinder is B&W – which professionals tend to prefer – as opposed to the VX2100's colour viewfinder (which appears pixellated and less well defined by comparison). The viewfinder can be moved from a horizontal to a near-vertical position. One thing we should comment upon at this point is that the rubber eyepiece isn't rigid enough to be of any use if the operator needs to hold the camera tight to the eye (for stability). The eyepiece simply collapses, and is pretty useless in this respect.
The large zoom rocker switch is positioned above the tape-compartment and hand-grip, with almost all the external connectors being found behind a rubber flap just before the lens on the body's right side. An additional smaller zoom rocker is positioned on the top of the carrying handle along with the second of three Record buttons to be found on the camcorder. VCR playback controls can be found on the upper side of the body underneath the rigid carrying handle. A Memory Stick slot is provided at the rear of the camcorder (although, strangely, it isn't Memory Stick PRO capable, and no media comes with the camcorder). Audio levels can be set to auto or manual using the menu system, with manual level control being administered by use of the tiny menu thumbwheel at the back of the camcorder. A range of audio input functions are selected using a control panel on the inner front of the carrying handle. These include switchable Mic and Line inputs, independent input channel assignment and microphone 48-volt Phantom powering. Two XLR inputs are provided on the outside right of the main handle body, with a bracket to hold the supplied microphone in addition to other appropriate microphones.
Features
Not only does this model offer a Colour Bar generator, but it also has a Zebra pattern generator (75%, 100% switchable) which provides a visual guide to peak white exposure, and the all-important ability to manually set Timecode in both Rec Run and Free Run modes. The former sees timecode being generated in the familiar sequential mode, and running only when the tape is rolling. The latter mode, also known as Time of Day mode, means that the timecode runs all the time, with the relevant time being recorded to tape when it's running. This is particularly useful when more than one camcorder is being used to record an event and where the timecode start points have been synchronised. The editor can synch the cameras by comparing and synching the relevant code for any given sequence. Also available is a U-Bits (User Bits) function, which enables the operator to embed additional alphanumeric information to tape as a means of identifying and tracking the source tape.
We shouldn't go much further without mentioning the PD170's image features, of course. 16:9 widescreen is now offered as an alternative to the conventional 4:3 aspect ratio shooting. It should be noted that the camcorder doesn't possess one of Sony's newer wide CCDs, but instead uses anamorphic lens techniques to squeeze a 16:9 aspect ratio picture into the 4:3 format recording. Played back on a conventional TV screen the picture will appear vertically stretched, though it will display as intended on a suitable widescreen TV. When some test footage was captured via FireWire into Adobe Premiere Pro, the resulting image size was 1024 x 576 pixels, which we successfully edited and burned to DVD. As with the VX2100, the PD170 also has Progressive Scan, but don't get too excited; although it combines the otherwise interlaced fields that make up each PAL frame at 25 fps, it's best used as a means of grabbing sharp still frames from video. Neither the PS nor variable electronic shutter can be used with the widescreen recording mode, it should be noted.
We found the Guide Frame feature useful, too. This superimposes a rectangular framing box into the centre of the viewfinder and LCD frame, making it useful for the framing of features that must sit in the safe area of the frame. It's also a rough guide to the positioning of subjects in frame when shooting 16:9 but where footage might later be ARC (Aspect Ratio Conversion) modified to play back on 4:3 screens. The cam also has a Spot Light (known, mysteriously as Back Light on other Sony camcorders) which over-rides the exposure in favour of foreground objects when framed against strong background light. The 2-step ND filter is very useful, especially when shooting in bright light. It has the effect of reducing the overall light level whilst maintaining image quality. Setting 1 effectively reduces light levels by 1/4, whereas Setting 2 gives a reduction of 1/32. An indication of the mode is given in the viewfinder. The addition of a Sony VCL-HG0758 0.7x wideangle conversion lens will also be a welcome addition to many serious and professional users of the PD170. At its most useful when shooting in confined spacious and where not only a wide field of view is required but also an increase in depth of focus is required (such as when shooting a conversation between people in a small room), the WA lens sits in place of the lens hood, although the casing which holds the lens element itself also acts of a lens hood.
Performance
The PD170 is not without its faults. For a start, the rubber eyepiece mentioned earlier can be a major niggle when needing to get hand-held shots quickly. Many serious users won't like having to operate the tiny thumbwheel every time a fairly basic function required changing, either. This was the case with the colour bar utility, which proved to be difficult to access when the LCD screen wasn't in use and when we were forced to navigate our way through the menu system. Switching audio, wide recording, and timecode generation modes requires a similar knowledge of the menu system – and that's where the PD170 (and, for that matter, its predecessor) doesn't match the performance of its bigger cousins. That said, picture performance is stunning for a camcorder of this calibre. Shooting on a crisp winter's morning beside a frozen lake under a blue sky, the PD170 gave us pictures that bore very accurate colour representation and whose general resolution was impressive when recording under fully auto as well as manual control.
Although the PD170 is aimed at professional users, it should be noted that there are some aspects of this model's design that betray its consumer roots. It's difficult to comprehend why Sony continues to feature such little-used (or perhaps even useless) functions as featured on its consumer models. Neither professional users nor serious enthusiasts use the title, fader or digital effects functions, so why does Sony continue to offer them? Don't all professionals use computer editing packages to add this stuff anyway? We'd like to see the Fader button being replaced with a Colour Bars button for a start. Two functions lead to a lot of fiddling and fumbling, namely the setting of Timecode and User Bits, which have to be done within the menu system. We had a great deal of trouble getting the U-Bits entry to work properly, and we couldn't set the Rec Run Timecode to run from 01 hours (a common method of identing a roll) for love nor money without it resetting to zero. Neither do we like the means of regulating audio input manually by use of the thumbwheel. Sure, the pro operator will probably take a stereo sound recordist's feed via twin XLR and fix the input levels accordingly, but if you're looking to manually control the mic onboard whilst looking through the viewfinder, forget it. Sony should really take a leaf out of Canon's book as with the XL1S and XM2 in this respect.
If you're serious about this cam, set aside some extra funds for higher-capacity batteries because the F330 won't give you more than 40 minutes recording. Even with the niggles, the DSR-PD170 is still a lovely beast that handles well on the tripod and in hand-held mode, and will undoubtedly gain a substantial market.
Conclusion
The DSR-PD170 doesn't come with sufficient new features to persuade existing users of the PD150 to trade up. Placed side by side with the latter, it would be hard to tell the difference at twenty paces - and only the enlarged rubber eyepiece is an immediate giveaway as to its identity. The camcorder itself is a joy to use and produces images and sound to a quality that will satisfy many users. The presence of balanced, switchable, audio inputs and other professional features like colour bars, zebra, ND, user-definable timecode and U-Bits means that the PD170 represents excellent value for money for the serious video producer.
Specifications: Sony DSR-PD170 DVCAM Camcorder
CCD: 3 x 1/3"
Exposure: Auto/Manual
Lens: f1.6 - f2.4
White Balance: Auto/Manual
Filter Diameter: 58mm
Program AE: Auto + 6 modes
Optical Zoom: 12x
Headphone Out: Yes
Digital Zoom: 48x
Microphone In: Yes
Movie Resolution: 3 x 400,000 effective
Still Photo Mode: None
Stills Resolution: n/a
Media Card: Memory Stick
Connectivity: Full DV & AV in/out
Bluetooth: No
Audio: PCM 12-bit/16-bit
Image Stabiliser: OIS
USB Streaming: None
Widescreen: Yes
LCD Screen: 2.5" Colour
Movie Light: No
Viewfinder: 0.24" Monochrome
Dimensions: 133x180x456 (W/H/D)
Focus: Auto/Manual
Weight: 1.7Kg
Review Summary
Points for: The DSR-PD170 has great design and handling, wide-angle lens supplied as standard, XLR balanced audio inputs, good manual lens functions, 16:9 anamorphic widescreen, great record quality.
Points against: Rubber eyepiece collapses on contact with eye, too many professional features buried in thumbwheel menu system, LCD screen could be 3.5". Timecode & U-Bits something of a fiddle to get right. No USB connection or Memory Stick PRO. Still not significantly different from the DSR-PD150.
Conclusion: Great professional-quality cam at the price. It will interesting to see what Sony comes up with in 12 months' time
Tuesday, November 6, 2007
Preview: DMC-L10
Preview based on a pre-production DMC-L10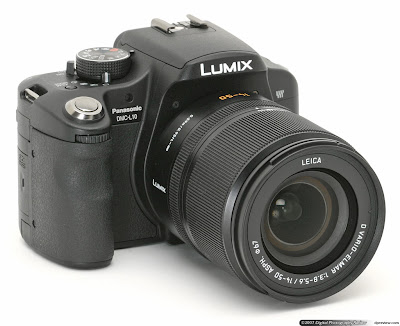
Eighteen months ago Panasonic's first digital SLR caused quite a stir at an otherwise lackluster PMA 2006, due in now small part to its unique Leica-inspired styling and Vario Elmarit 14-50mm optically stabilized lens. But ultimately the DMC-L1, failed to translate all that launch interest into actual sales. This was thanks in part to its high price (the kit lens accounting for half the $2000 ticket) and rather slender feature set. But the other problem - shared with the Olympus E330 (on which it was based and with which it shared many components) - was that the bulky unconventional styling, dismal viewfinder and clunky Live View Implementation sent potential purchasers scurrying back to the 'safe' choice of an SLR from a more mainstream manufacturer.
And now we have the second Panasonic Lumix DSLR, the DMC-L10, a far more conventional affair (it actually looks a lot like a reflex version of the FZ50) that offers some significant new features including a fully articulating LCD monitor, user interface improvements, a resolution hike to ten megapixels and the ability to use contrast-detect autofocus in Live View mode using the sensor itself (though only with compatible lenses - basically the two new zooms announced today). There are also several features that have migrated from Panasonic's compact Lumix range, including Intelligent ISO mode, quick 'FUNC' menu and a sprinkling of scene modes.
Like the L1 the new model is the fruit of the partnership between Panasonic and Olympus, and once again it features a Live MOS sensor and SSWF dust removal filter, (we don't have definite information yet, but the mirror box and sensor are, we suspect the same as the E-410). Once again the kit lens is a Panasonic/Leica collaboration, complete with optical image stabilization, though (presumably to keep costs down) it is a lighter, slower zoom (F3.8-5.6) and it doesn't have an aperture ring. The L10 also does away with the L1's traditional shutter speed dial in favor of twin control dials.
Simon: we've actually been using the DMC-L10 for a few weeks now and were under the impression we'd be able to post a full 'Beta' gallery today and so I've actually taken several hundred gallery shots. Unfortunately last night Panasonic informed us that we could only post low resolution versions as image quality has not been finalized. Since we have a policy of only providing 'the whole truth' when it comes to image samples we've decided not to publish any sample images until we have a final production camera.
Compared to the DMC-L1, feature and specification differences
The L10 is a very different beast to the camera that came before it, and is obviously aimed at a very different segment of the market. Where the L1 was a solid, heavy lump of a camera with a semi professional build, traditional 'shutter speed and aperture dial' operation and styling that owed more than a nod to Leica's rangefinder models, the L10 is a lightweight, conventionally styled SLR with a control interface and feature set that matches mid-range models from the bigger players in the market. You don't get the L1's tank-like build, and some users will bemoan the loss of the unique 'bounce' 2-position flash and aperture ring, but I think it's safe to say that the L10 is far more likely to lift Panasonic out of its niche position in the DLSR market than the L1 ever could.
The main spec differences (as we know them today) are shown below, but first let's start with a summary of the important stuff:
New lightweight compact body.
Resolution increase (from 7.5 to 10 megapixels).
Slightly brighter viewfinder (with optional 1.2x magnifier eyepiece included) .
Articulating screen (180° swing and tilt).
New smaller, lighter kit lens (around a stop slower max aperture too).
All-new control interface.
Contrast detect autofocus in live view (mirror stays up) - with compatible lens
Less expensive than L1 at launch (though recent L1 price drops may reduce gap in store).
specification
Review: Panasonic DMC-FZ18
Review based on a production Panasonic DMC-FZ18
Barely half a year after the introduction of the DMC-FZ8, Panasonic added another model to its popular range of compact 'super zoom' Lumix cameras in the shape of the FZ18. Although obviously based on the FZ8 (they are externally almost identical), the FZ18 doesn't replace it; it's a sort of 'big brother' with a bigger zoom, more pixels and a smattering of new features.
The biggest news is the optically stabilized lens, which has 'grown' at both ends and now sports a whopping 18x (28-504mm equiv.) zoom, putting the FZ18 into direct competition with Olympus' SP-550UZ (now updated to the SP-560UZ) and Fujifilm's recently announced FinePix S8000fd.
Almost inevitably the FZ18 squeezes even more pixels onto its 1/2.5-inch sensor, although the increase has been fairly moderate from 7.3 to 8.3 megapixels. Other new features include a dedicated AF/AE button, Face Detection and a new Intelligent Auto mode which integrates Image Stabilization, Intelligent ISO, Face Detection and Scene Detection into a 'Super' Auto Mode.
Despite the usual noise issues you would expect from a tiny sensor/big zoom camera (and our dislike of Panasonic's approach to noise reduction), overall we were pretty impressed with the FZ8 when we reviewed it a few months ago. This was to a large degree due to the superb LEICA lens. So let's find out how Panasonic have tackled the noise challenge - and if the new lens, with it's much more ambitious zoom range, can match its predecessor, starting with a look at what's changed:
Major differences to DMC-FZ8
18x optical zoom (28-504mm equiv.) - FZ8 has 12x (36-432mm) zoom
Smaller maximum aperture at long end of zoom (F4.2 vs F3.1)
8.3 megapixel sensor (vs 7.2 megapixel)
Face Detection
Intelligent Auto mode
Manually selectable ISO 1600
ISO 6400 High Sensitivity mode
AF/AE lock button and dedicated AF/MF button
1cm macro (was 5cm)
Custom mode and extra scene modes (plus 'advanced scene modes')
Five level Noise reduction (was three level)
Slower continuous shooting (burst)
Heavier and slightly larger
Panasonic Lumix DMC-FZ18 specifications
Tuesday, August 21, 2007
Digital-Film Camera Differences

Powering the camera:
Film: Takes disposable batteries that require infrequent replacement.
Digital: Takes one or more of a variety of battery types--both disposable and rechargeable--that require frequent replacement or recharging.
Recording pictures:
Film: Uses film, which comes in various frame sizes and different sensitivities to light.
Digital: Uses a fixed, light-sensitive, silicon chip that comes in two varieties: CCD or CMOS. This chip determines the frame size and the light sensitivity of the camera. You can simulate the effects of using different types of film via settings within the camera.
 Framing shots:
Digital: Uses an optical viewfinder, as well as an LCD that displays 100 percent of the scene. But an LCD can be hard to see in bright light and uses a lot of battery power. Many cameras substitute the optical viewfinder with the kind of electronic viewfinder (EVF) that is used on camcorders. Photographers who are used to optical viewfinders don't always like EVFs, so try before you buy.
Snapping shots:
Film: Instantaneous capture.
Digital: Varies wildly, depending upon image size, file format, media type, memory available for temporary storage, sensor type, and speed of autofocus
Film: Stores images directly on the capture medium (film), which is single-use and supplies a fixed number of frames per roll.
Digital: Stores images as digital files on reusable memory cards or discs, both of which come in various capacities and can hold a variable number of frames per card.
JPEG
Small and fast for capture but has file compression that may introduce artifacts that degrade image quality.
RAW
Smaller than TIFFs and more flexible for postcapture retouching. Not offered on all cameras, and special software is required to read them.
TIFF
Large files that can slow down your shooting and fill up your media but have no compression artifacts.
Saturday, August 18, 2007
history of photography-Pinhole cameras

Pinhole cameras - remember them? You might have made one in science class. Punch a hole in an oatmeal cereal can, put film inside, uncover the hole momentarily, and then develop the film.
Pinholes have been in use a long time, originating as perspective viewing devices as far back as 1425 by Filippo Brunelleschi. Camera obscuras, based on the pinhole principle, were built - one example exists in Edinburgh, Scotland in a tower on the Royal Mile below the Castle. Some of the first pinhole photographs were made by Sir David Brewster in 1859. By the early 1900s, pinhole photographs were again relegated to the dustbin of history, with lensed cameras overtaking the pinhole in convenience and speed. Kodak briefly made a commercial pinhole camera in the 1940s. Pinhole photography today remains primarily an artistic medium enjoyed by a dedicated group of photographers, and several web sites provide rich information on pinhole photography techniques. It´s all nice and fine How to Make a Pinhole Camera
okay ok... come to the present 
Zero Image is a Hong Kong based company, producing a range of beautifully designed and finished pinhole cameras in a variety of formats, all of which we are stocking. All the cameras are made with exceptional attention to detail in selected high-quality teak wood. More than 15 layers of coating is applied by hand to each camera, to insure maximum protection of the wood. The metal parts are hand-turned, solid brass.
A coating is applied to all of the brass parts to prevent them from oxidizing. All are gloss varnished with brass fittings, and supplied with a certificate showing edition number.Brass shim of 0.001" is used for pinhole construction, making the pinhole conform to a more accurate film stop number and yield sharper images.
You like this photograph this take by a Panoramic Pinhole camera! why don´t you try this How to Make a Panoramic Pinhole Camera

some use full links:
http://www.pinhole.org
http://www.pinholeresource.com/pinhole.html
http://www.pinhole.cz/en/pinholecameras/whatis.html
http://www.northlight-images.co.uk/article_pages/Canon_1ds_pinhole.html